Creating a Tile Server From Sentinel Data
Now that we have ingested data, we can use it using a tile server. We will be using the catalog that was created in Ingesting a Sentinel Image.
Note: This guide will focus on converting the raster into a Pillow, RGB
image so that it can be used by the tile server. The tile server process itself
is discussed in more detail in Greyscale Tile Server Code Breakdown.
The Code
Because we are working with a RGB, a multiband image, we will need to correct the colors for each tile in order for it to displayed correctly.
import io
import numpy as np
import rasterio

from flask import Flask, make_response
from PIL import Image

from geopyspark.geopycontext import GeoPyContext
from geopyspark.geotrellis.catalog import read_value
from geopyspark.geotrellis.constants import SPATIAL


# normalize the data so that it falls in the range of 0 - 255
def make_image(arr):
    adjusted = ((arr - whole_min) * 255) / (whole_max - whole_min)
    return Image.fromarray(adjusted.astype('uint8')).resize((256, 256), Image.NEAREST).convert('L')


app = Flask(__name__)

@app.route("/<int:zoom>/<int:x>/<int:y>.png")
def tile(x, y, zoom):
    # fetch tile

    tile = read_value(geopysc, SPATIAL, uri, layer_name, zoom, x, y)
    arr = tile['data']

    bands = arr.shape[0]
    arrs = [np.array(arr[x, :, :]).reshape(256, 256) for x in range(bands)]

    # display tile
    images = [make_image(arr) for arr in arrs]
    image = Image.merge('RGB', images)

    bio = io.BytesIO()
    image.save(bio, 'PNG')
    response = make_response(bio.getvalue())
    response.headers['Content-Type'] = 'image/png'
    response.headers['Content-Disposition'] = 'filename=%d.png' % 0

    return response


if __name__ == "__main__":
    uri = "file:///tmp/sentinel-catalog"
    layer_name = "sentinel-example"

    geopysc = GeoPyContext(appName="s3-flask", master="local[*]")

    with open('/tmp/sentinel_stats.txt', 'r') as f:
        lines = f.readlines()
        whole_max = int(lines[0])
        whole_min = int(lines[1])

    app.run()
Running the Code
Running the tile server is done the same way as in Greyscale Tile Server Running the Code. The only difference being the resulting image, of course.
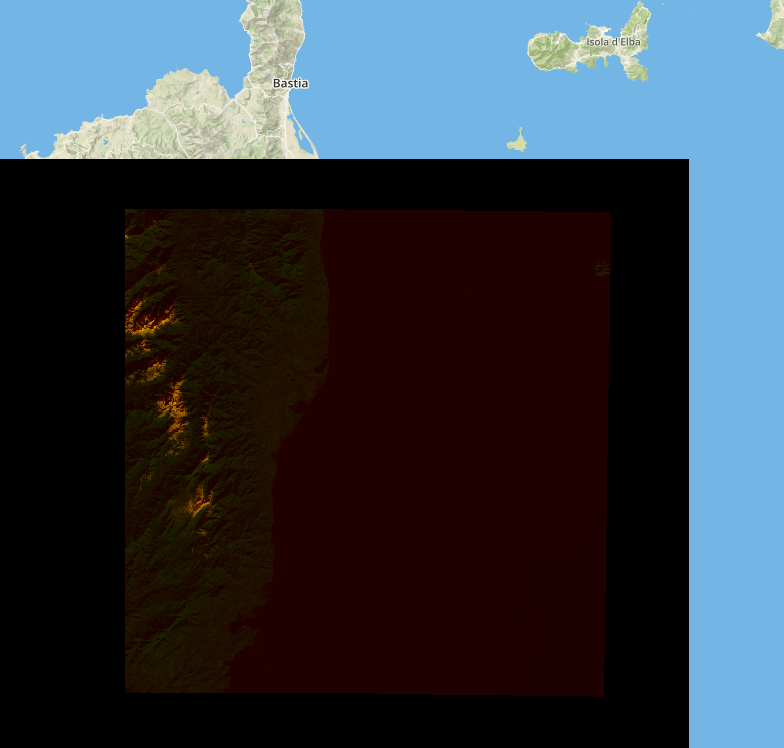
You’ll need to scroll over Corsica, and you should see something that matches the above image. If you do, then the server works!
Breaking Down the Code
This next section will go over how to prepare the RGB image to be served. For a more of a general overview of to setup a tile server please see Greyscale Tile Server Code Breakdown.
Setup
if __name__ == "__main__":
    uri = "file:///tmp/sentinel-catalog"
    layer_name = "sentinel-example"

    geopysc = GeoPyContext(appName="s3-flask", master="local[*]")

    with open('/tmp/sentinel_stats.txt', 'r') as f:
        lines = f.readlines()
        whole_max = int(lines[0])
        whole_min = int(lines[1])

    app.run()
In additon to setting up uri and layer_name, we will also read in the
max and min values that we saved earlier. These will be used when we
normalize a tile.
Preparing the Tile
# normalize the data so that it falls in the range of 0 - 255
def make_image(arr):
    adjusted = ((arr - whole_min) * 255) / (whole_max - whole_min)
    return Image.fromarray(adjusted.astype('uint8')).resize((256, 256), Image.NEAREST).convert('L')

app = Flask(__name__)

@app.route("/<int:zoom>/<int:x>/<int:y>.png")
def tile(x, y, zoom):
    # fetch tile

    tile = read_value(geopysc, SPATIAL, uri, layer_name, zoom, x, y)
    arr = tile['data']

    bands = arr.shape[0]
    arrs = [np.array(arr[x, :, :]).reshape(256, 256) for x in range(bands)]

    # display tile
    images = [make_image(arr) for arr in arrs]
    image = Image.merge('RGB', images)
Tiles that contain multibands need some work done before they can be served.
The make_image method takes each band and normalizes it between a range
of 0 and 255. We need to do this because Pillow expects the data types of
arrays to be uint8. This is why we need the whole_max and the
whole_min values; as we needed to know the full range of the original
values before normalization. Information that would be otherwise impossible to
get at this point.
Once normalized, the band is then converted to a greyscale image. This is done
for each band in the tile, and once complete, we can then make a RGB png
file. After this step, the remaining process is no different than if you were
working with a singleband tile.
Any details that we not discussed in this document can be found in Greyscale Tile Server Code Breakdown.