Creating a Tile Server From Greyscale Data
Now that we have ingested data, we can use it using a tile server. We will be using the catalog that was created in Ingesting a Grayscale Image.
Note: GeoPySpark can create a tile server from a catalog that was created via GeoTrellis!
The Code
Here is the code itself. We will be using flask to create a local server
and Pillow to create our images. For this example, we are working with
singleband, grayscale images; so we do not need to worry about color
correction.
import io
import numpy as np

from PIL import Image
from flask import Flask, make_response
from geopyspark.geopycontext import GeoPyContext
from geopyspark.geotrellis.catalog import read_value
from geopyspark.geotrellis.constants import SPATIAL


app = Flask(__name__)

@app.route("/<int:zoom>/<int:x>/<int:y>.png")
def tile(x, y, zoom):

    # fetch tile
    tile = read_value(geopycontext,
                      SPATIAL,
                      uri,
                      layer_name,
                      zoom,
                      x,
                      y)

    data = np.int32(tile['data']).reshape(256, 256)

    # display tile
    bio = io.BytesIO()
    im = Image.fromarray(data).resize((256, 256), Image.NEAREST).convert('L')
    im.save(bio, 'PNG')

    response = make_response(bio.getvalue())
    response.headers['Content-Type'] = 'image/png'
    response.headers['Content-Disposition'] = 'filename=%d.png' % 0

    return response


if __name__ == "__main__":
    uri = "file:///tmp/python-catalog/"
    layer_name = "python-ingest"

    geopycontext = GeoPyContext(appName="server-example", master="local[*]")

    app.run()
Running the Code
You will want to run this code through the command line. To run it, from the file, go to the directory the file is in and run this command
python3 file.py
Just replace file.py with whatever name you decided to call the file.
Once it’s started, you’ll then want to go to a website that allows you to display geo-spatial images from a server. For this example, we’ll be using geojson.io, but feel free to use whatever service you want.
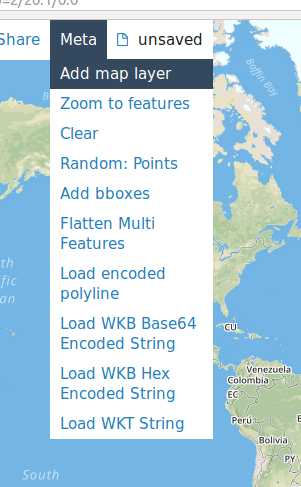
Go to geojson.io, and select the Meta option from the tool bar, and then
choose the Add map layer command.
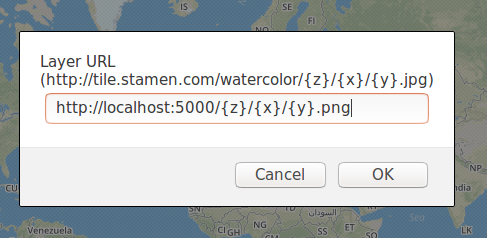
A pop up will appear where it will ask for the template, layer URL. To get this example to work,
please enter the following: http://localhost:5000/{z}/{x}/{y}.png.
A second window will appear asking to name the new layer. Pick whatever you want.
I tend to use simple names like a, b, c, etc.
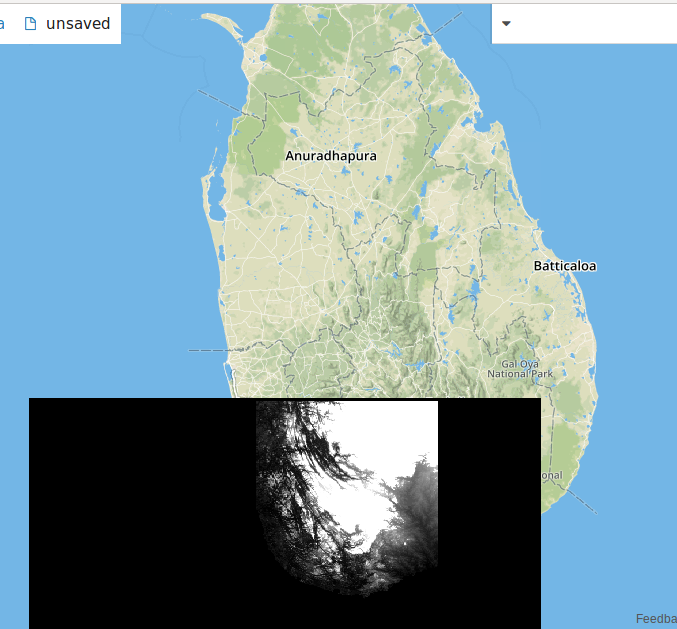
Now that everything is setup, it’s time to see the image. You’ll need to scroll in to Sri Lanka and a black-and-white elevation map should appear. If what you’re seeing matches the image above, then the tile server works!
Breaking Down the Code
As with our other examples, let’s go through it step-by-step to see what’s actually going on. Though, for this example, we’ll be starting at the bottom and working our way up.
Setup
if __name__ == "__main__":
    uri = "file:///tmp/python-catalog/"
    layer_name = "python-benchmark"

    geopycontext = GeoPyContext(appName="server-example", master="local[*]")

    app.run()
Before getting the tiles, we’ll need to setup some constants that will be used.
In this case, the uri, layer_name, and GeoPyContext will remain the
same each time a tile is fetched. This is also where flask is started via
app.run().
Fetching the Tile
app = Flask(__name__)

@app.route("/<int:zoom>/<int:x>/<int:y>.png")
def tile(x, y, zoom):

    # fetch tile
    tile = read_value(geopycontext,
                      SPATIAL,
                      uri,
                      layer_name,
                      zoom,
                      x,
                      y)

    data = np.int32(tile['data']).reshape(256, 256)

    # display tile
    bio = io.BytesIO()
    im = Image.fromarray(data).resize((256, 256), Image.NEAREST).convert('L')
    im.save(bio, 'PNG')

    response = make_response(bio.getvalue())
    response.headers['Content-Type'] = 'image/png'
    response.headers['Content-Disposition'] = 'filename=%d.png' % 0

    return response
This section of the code is where the tile read from the catalog and made into
a PNG which can then be displayed. Because the tiles are stored as a grid
within the catalog, giving the zoom level, col, and row of the tile
will allow us to retrieve it.
read_value() returns a Raster, so
we take out the underlying data and place it into a new NumPy array where
the data type is int32.
Once we have the NumPy array, we can turn it into an Image which we can
then turn into a PNG. We turn this PNG into a flask response, which
allows the tiles themselves to viewed on geojson.io.